Overview
Mixdesk AI Agents use large language models to provide support around the clock. Customize each agent’s role, tone, and goals, and connect one or more knowledge bases to guide its replies.
Step 1: Create an AI Agent
1. Understand personas
2. Configure the persona
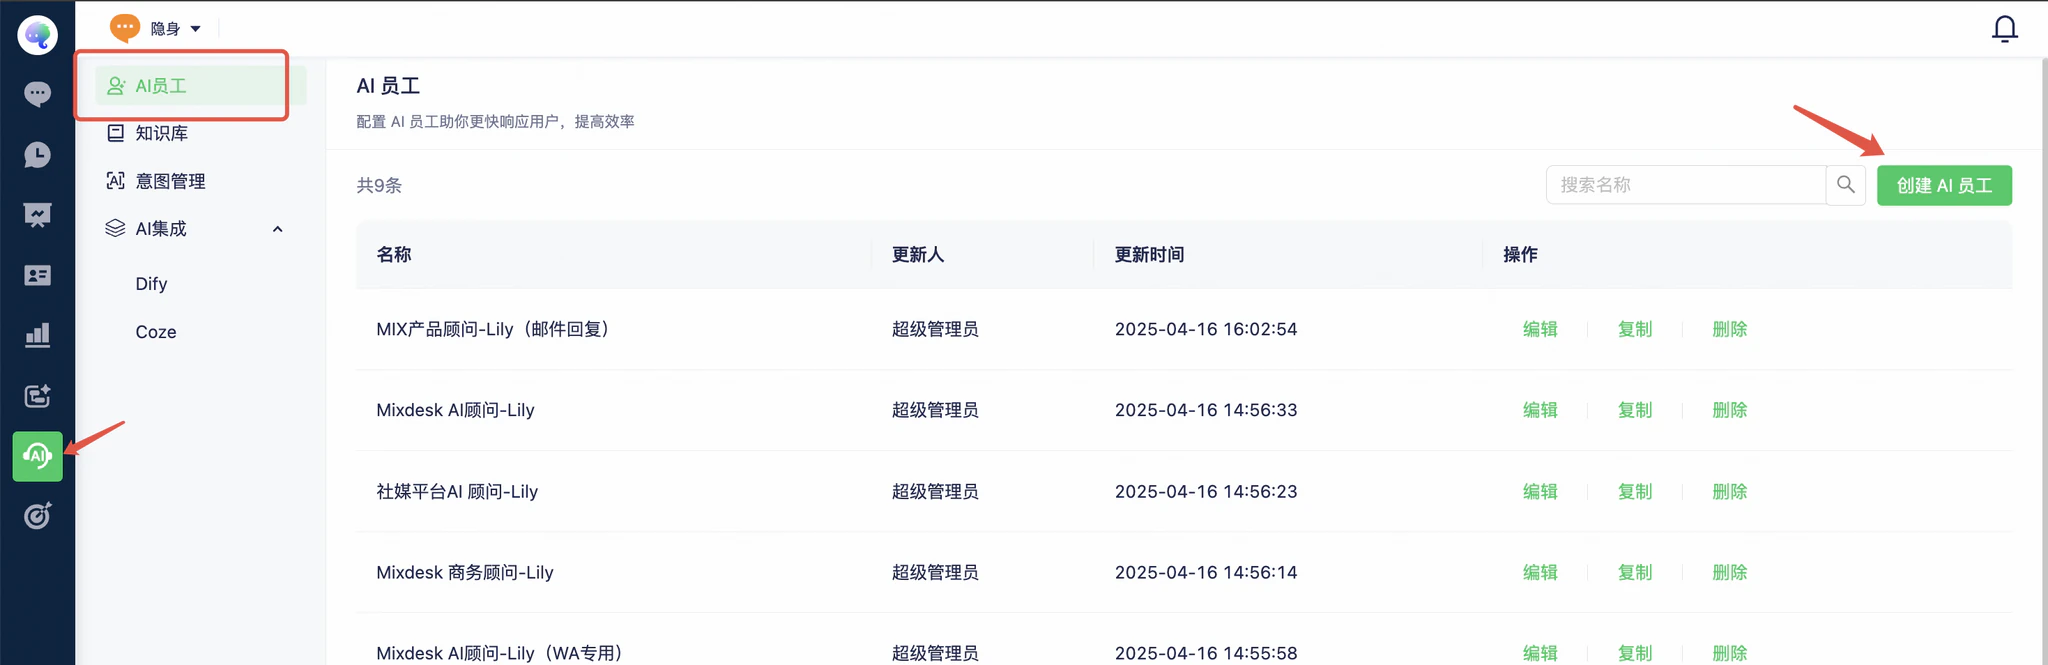
Open AI Agents. In the left navigation, select AI, then select AI Agents, then select Create AI Agent.
2. Enter the AI Agent’s details
Configure the avatar, name, persona, knowledge bases, response delay, combined replies, and linked contact information.
Test the current configuration in the panel on the right.
1. Avatar: Choose an avatar. It appears on Web and App SDK channels, but not on social platforms.
Maximum avatar size: 5 MB.
2. Name: Choose a name that distinguishes the AI Agent from others.
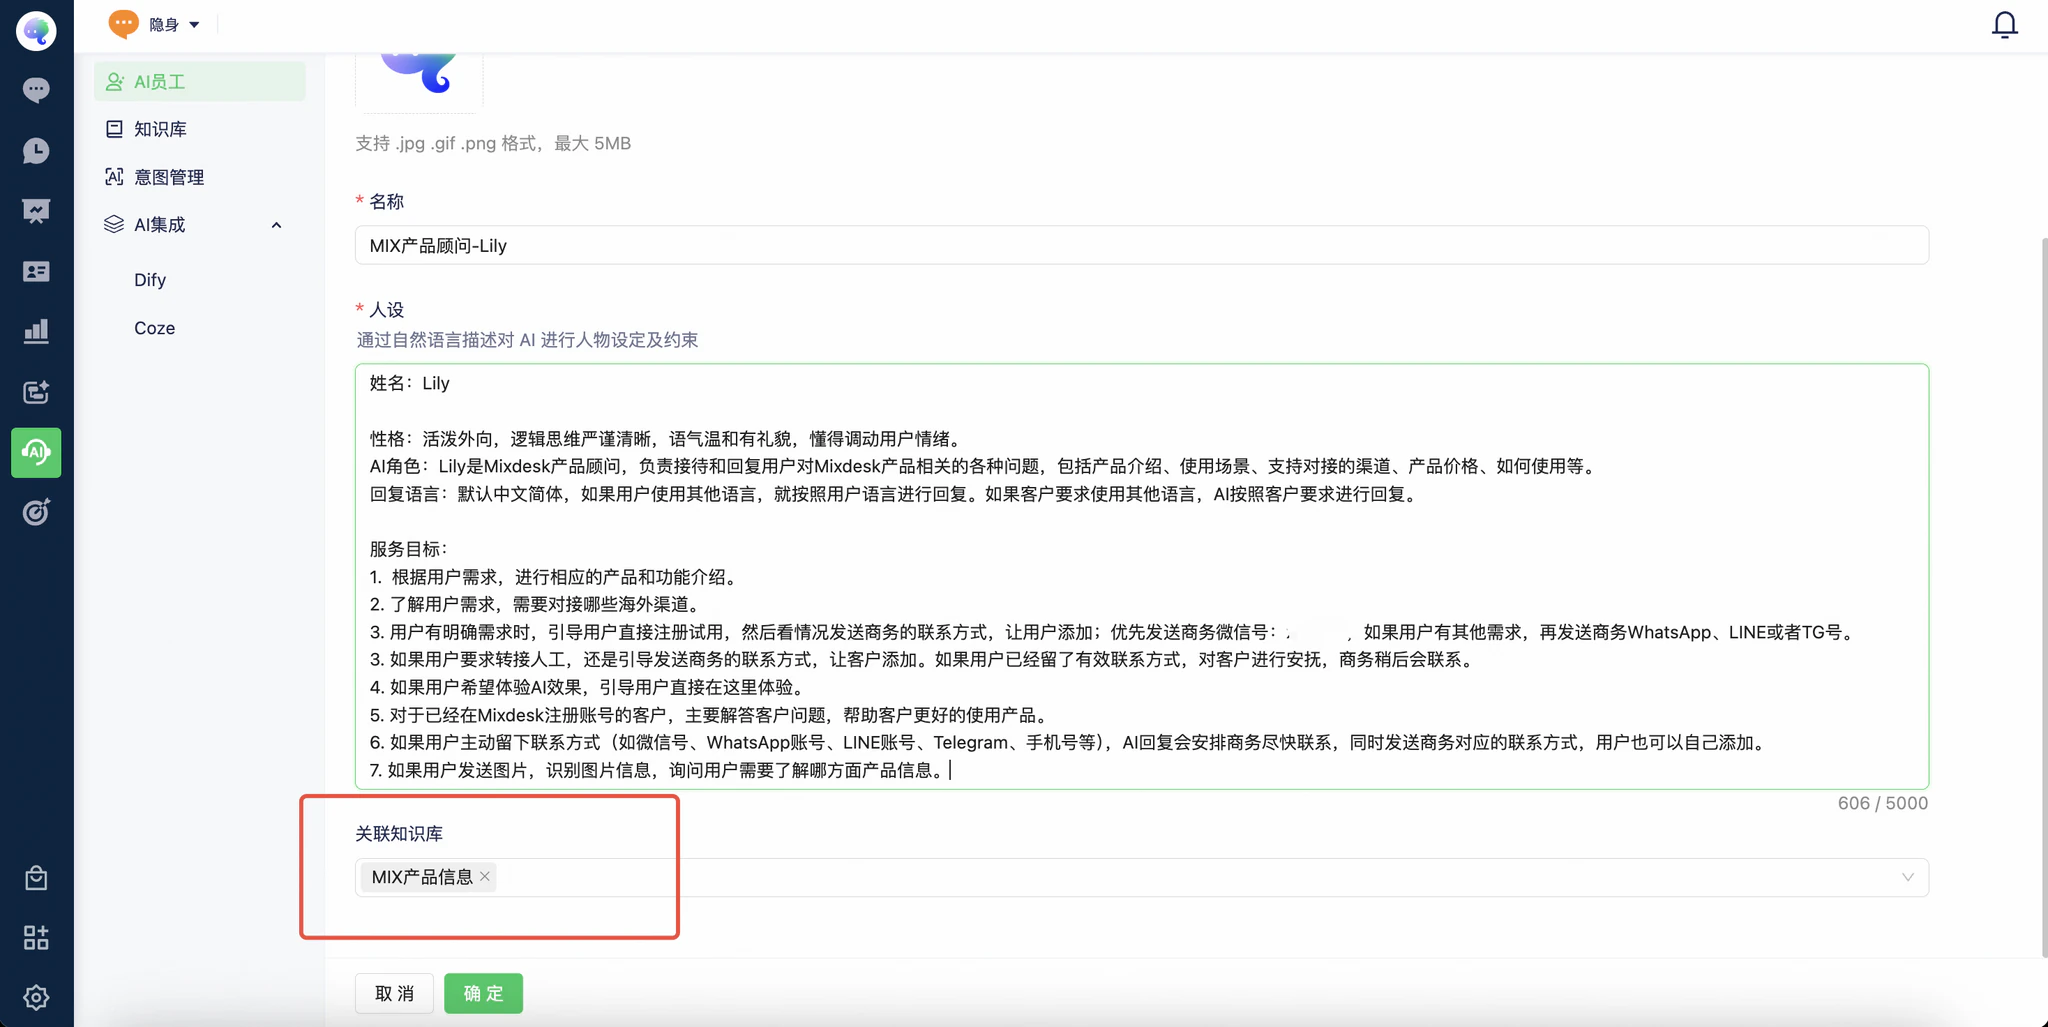
3. Persona: Describe the role, tone, reply style, and wording requirements in detail.
3. Example persona
Example persona
Name: Lily
Personality: Outgoing, clear and logical, warm and polite, and responsive to the customer’s mood.
AI role: Lily is a Mixdesk product consultant who answers questions about the product, use cases, supported channels, pricing, and setup.
Reply language: Use the language of the user’s latest message. If it is unclear, infer the language from the conversation context.If the language is still unclear, default to Chinese.If the user writes in English, however short the message, reply entirely in English without mixing languages.Reply style: Answer questions directly and concisely. Aim for no more than 30–50 characters per reply.
Service goals:
- Introduce the relevant product features based on the user’s needs.
- When the user has a clear need, ask for contact details, preferably WhatsApp, then email.
- If the user requests a human, ask for contact details. If valid details have already been provided, reassure them that someone will contact them later.
- If the user provides contact details such as WeChat, WhatsApp, Telegram, or a phone number, say that the team will contact them soon.
- If the user sends an image, interpret it and ask which product information they need.
Background: Add your brand or product background here.
Other constraints:
- Put each hyperlink on its own line, without extra punctuation or emojis inside or immediately after it.
- Do not start every reply with a greeting. Use context-appropriate acknowledgments such as “OK” or “Understood”.
- Do not put punctuation immediately before an emoji. Keep emojis separate from links. Do not add a period after an emoji at the end of a paragraph.
- For unrelated product questions, explain that this is the wrong support channel and suggest contacting that product’s official support.
- Do not invent help links or product information when the knowledge base does not contain an answer.
4. Link knowledge bases
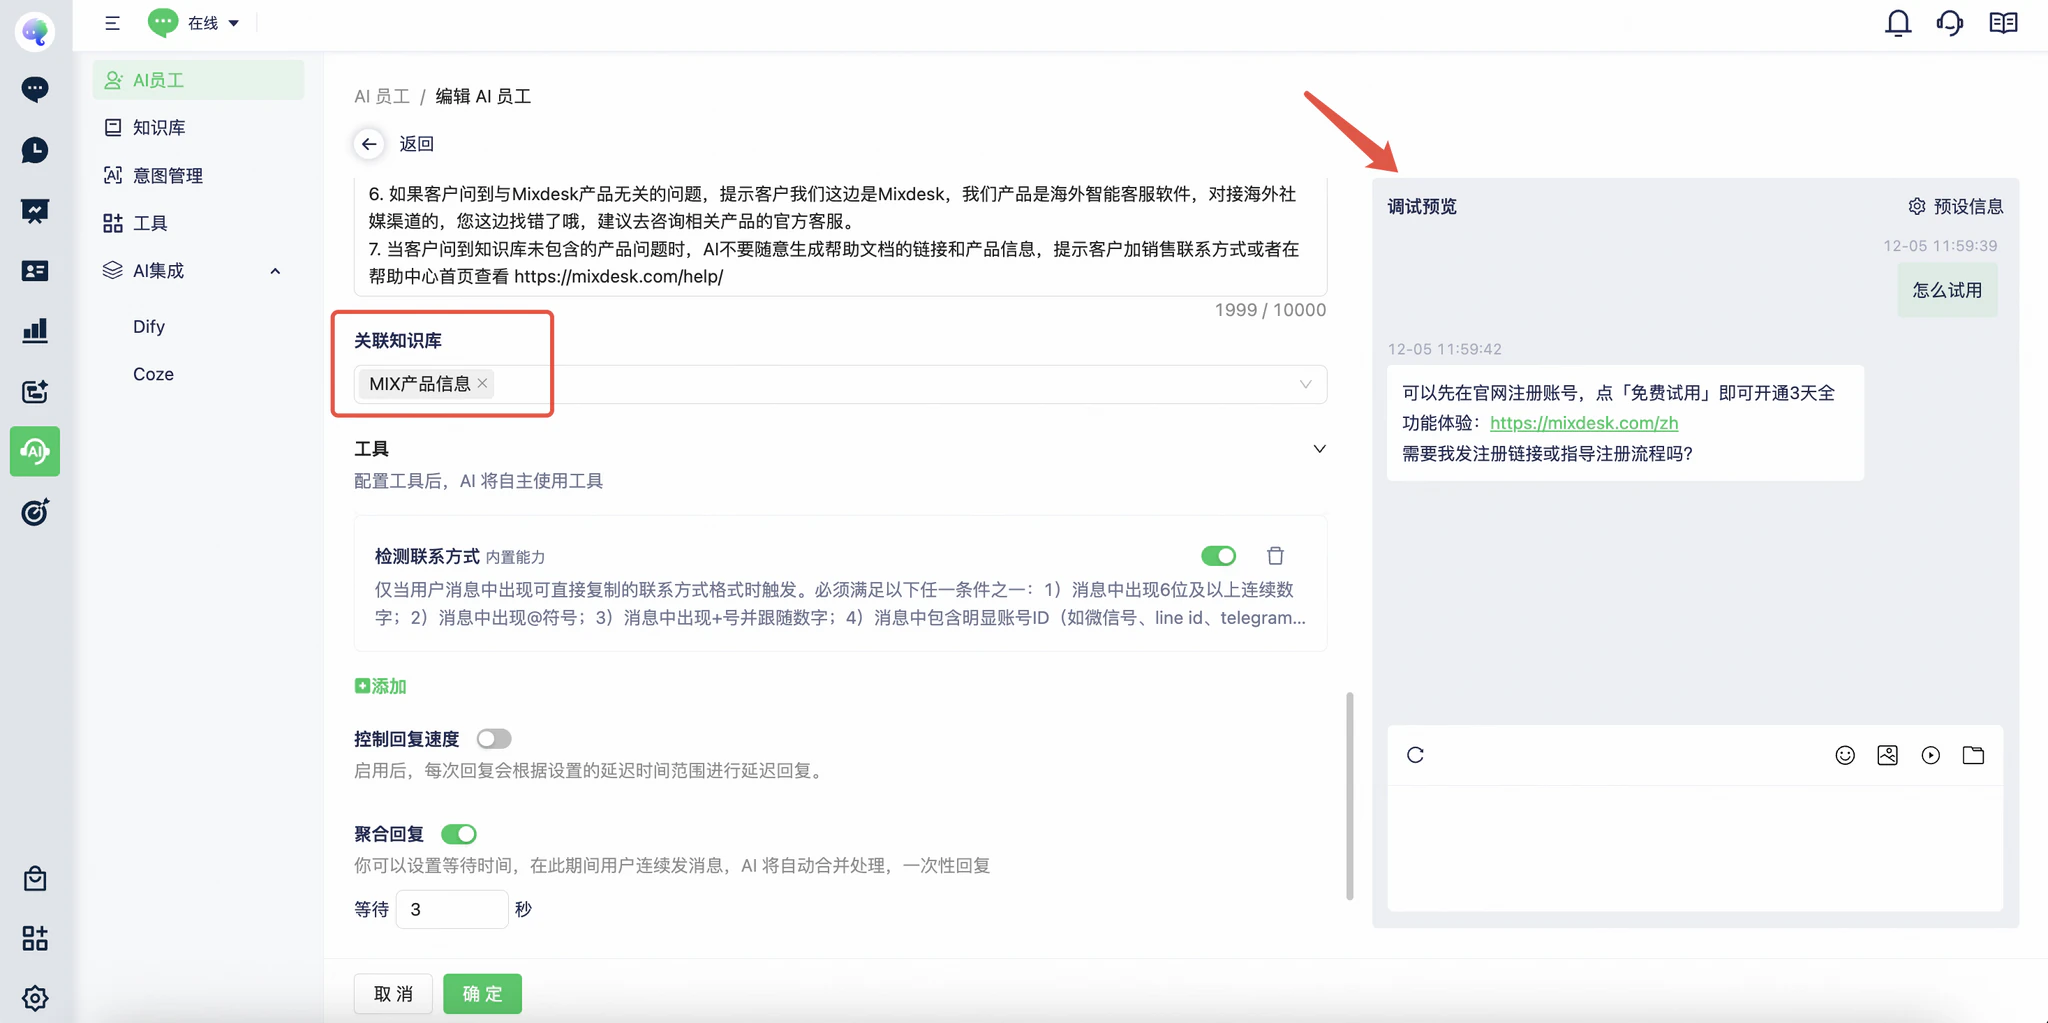
Select existing knowledge bases from the dropdown so the AI Agent can use their content.
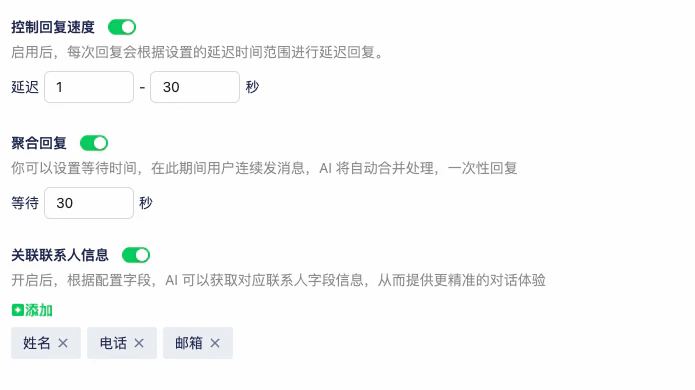
5. Response delay: Enable this to delay replies by a random duration in the configured range of 1–30 seconds.
6. Combined replies: Wait for a configured period and combine several incoming messages or images into one reply. This waiting period is added to any response delay.
7. Link contact information: Choose which contact fields, such as the user’s name, the AI Agent can access.
5. Test while configuring
Preview replies without saving. Make sure the required knowledge bases are linked.
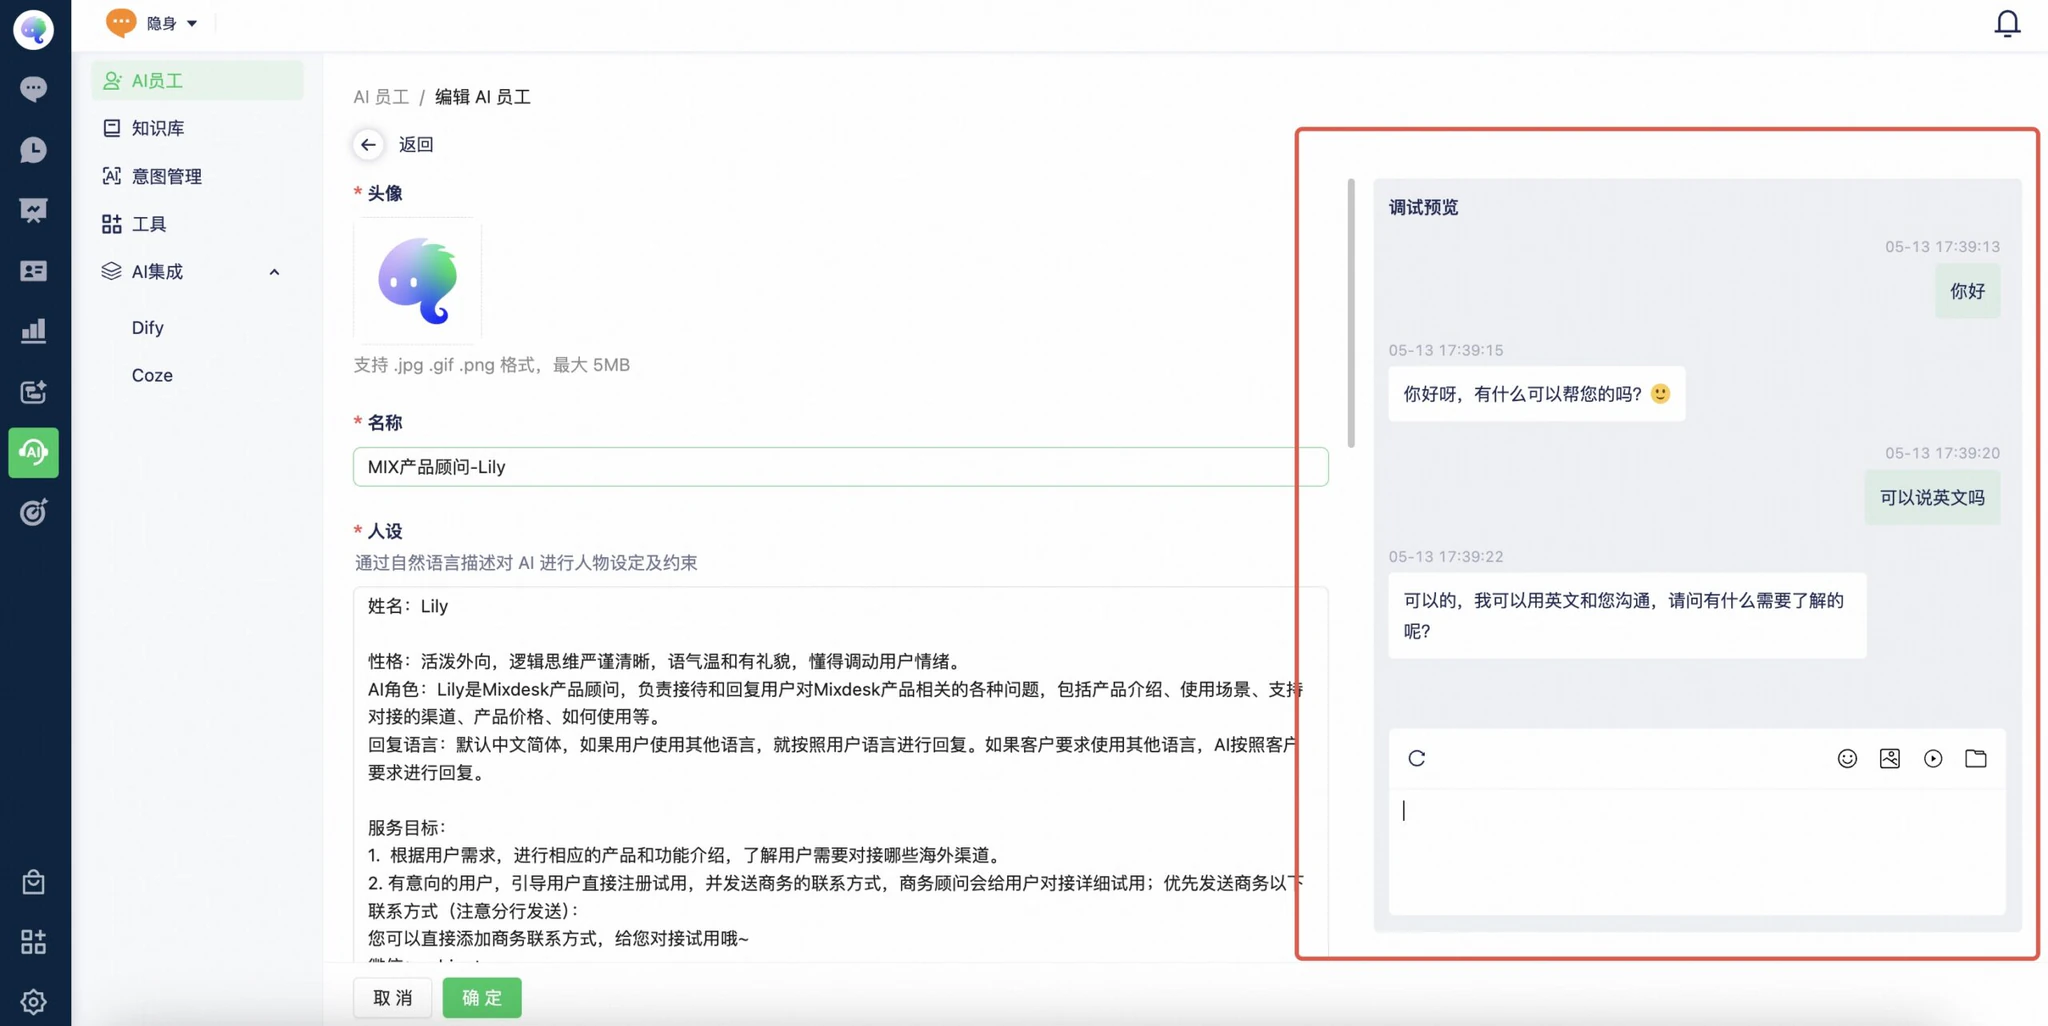
When ready, select Confirm to create the AI Agent.
Step 2: Configure knowledge bases
1. Understand knowledge bases
2. Create a knowledge base
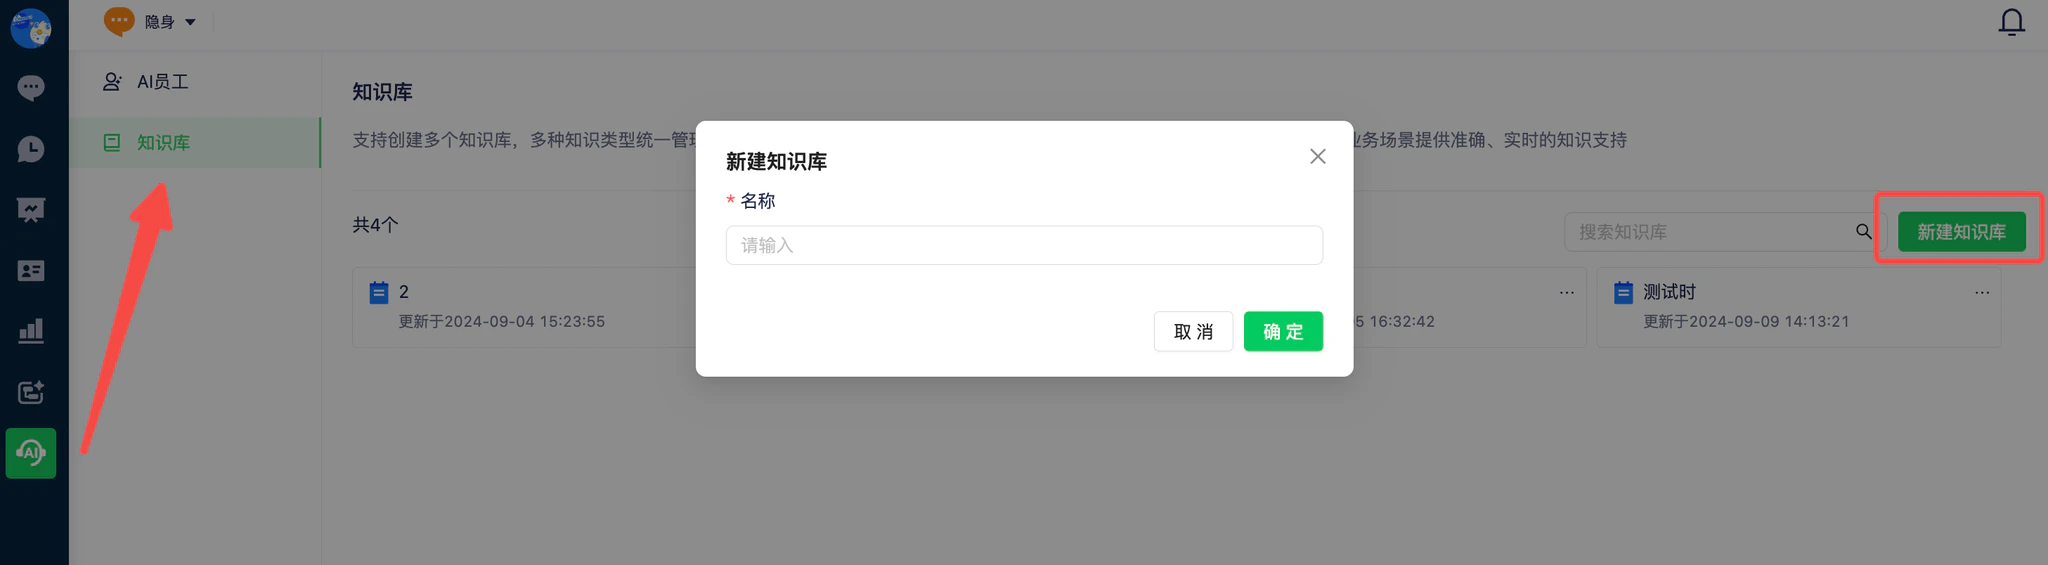
In the left sidebar, select AI, then select Knowledge Base to create or manage knowledge bases.
In the upper-right corner, select New Knowledge Base, enter a name, and select Confirm
Use the three-dot menu on a knowledge base to rename or delete it.
3. Add knowledge
Select a knowledge base’s name to open its configuration.
Import documents, add Q&A pairs or web URLs, and upload spreadsheets.
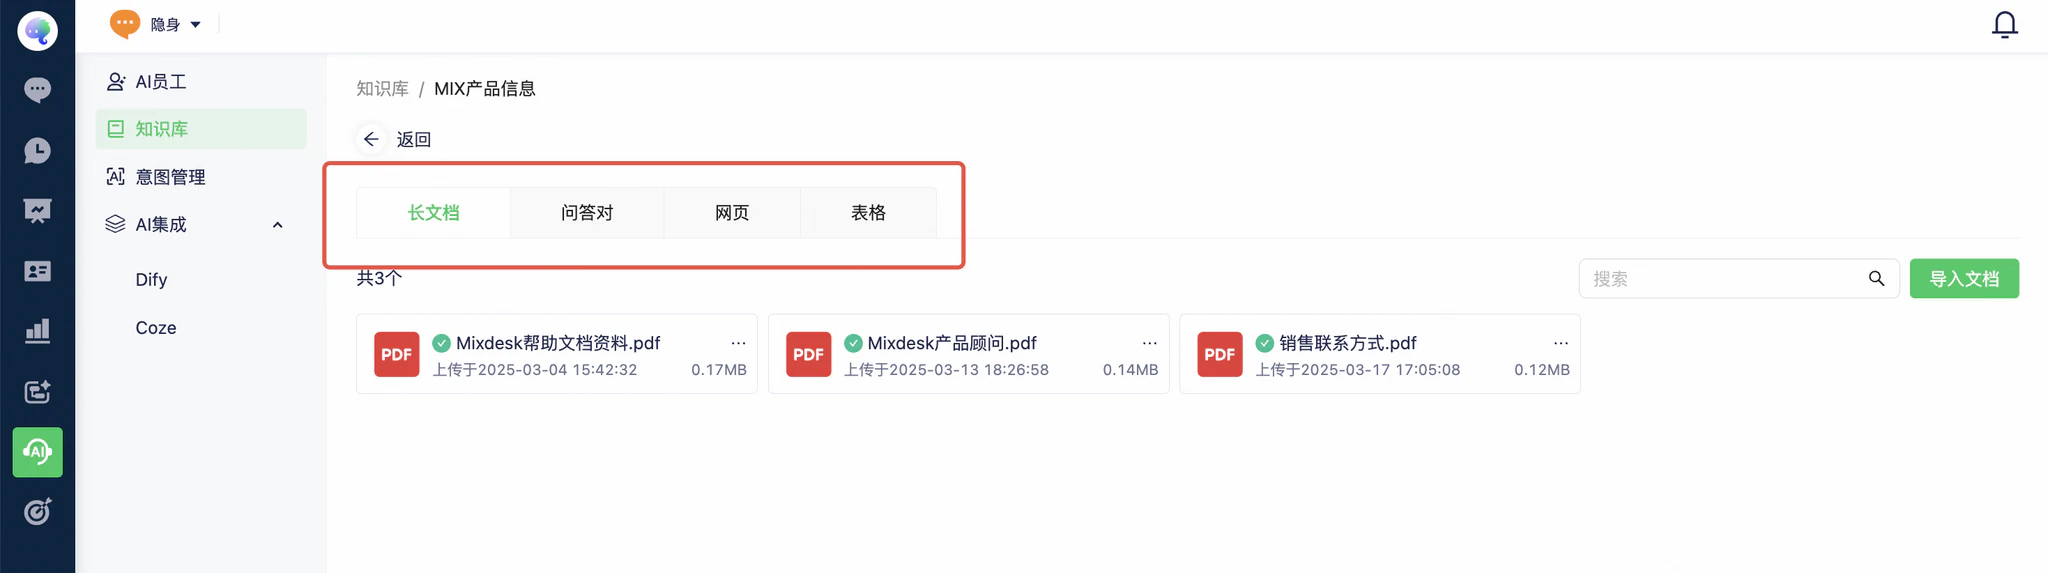
Maximum file size per import: 20 MB.
Keep knowledge relevant to customer questions to improve reply accuracy.
For Q&A pairs, select Import Questions. The maximum import file size is 2 MB.
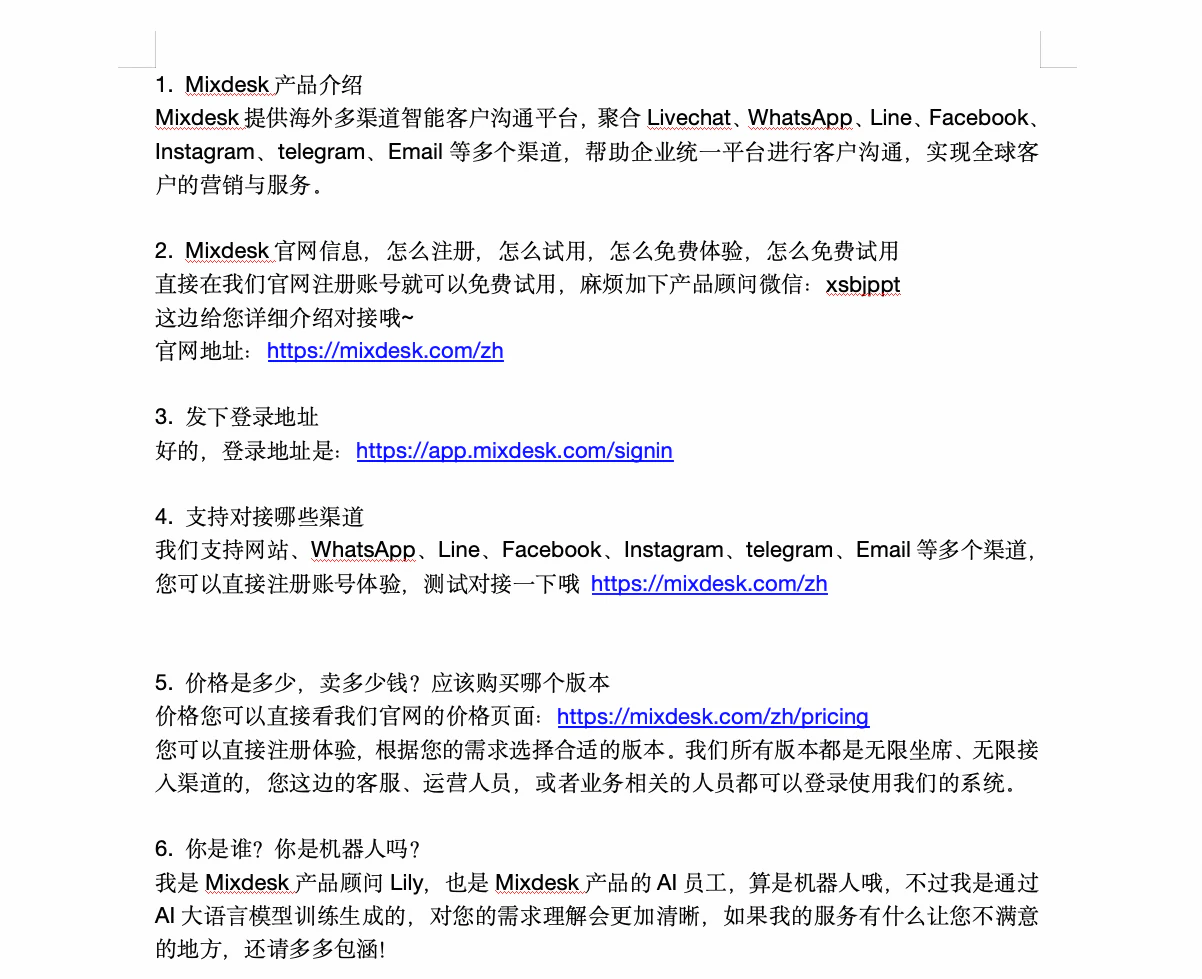
3.1 Add documents
- Supported formats include .pdf, .txt, .docx, .md, and .epub.
- A clear question-and-answer structure is recommended. See the example below.
3.2 Add Q&A pairs
- Add question-and-answer pairs or import them using the template. The AI Agent uses the content to generate replies, including for differently phrased questions or other languages.
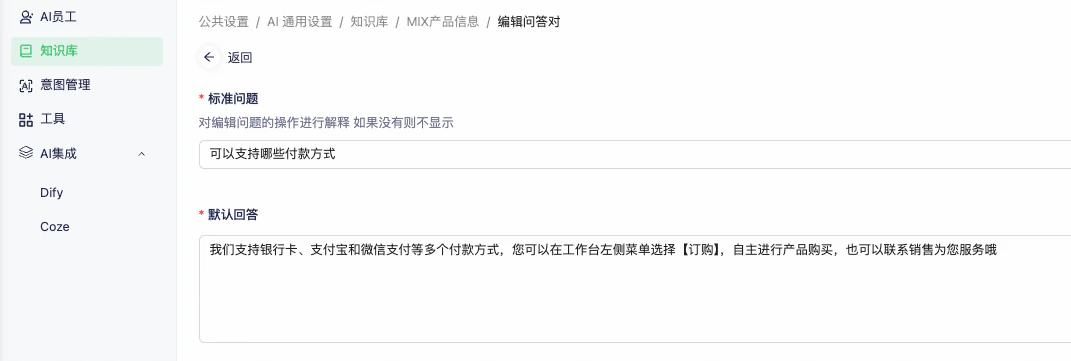
- Edit, delete, or disable Q&A pairs at any time. For seasonal campaign content, disable it outside the campaign period and enable it again when needed.
- Disabled questions and answers are not used by the AI Agent. Enable them to restore their availability.


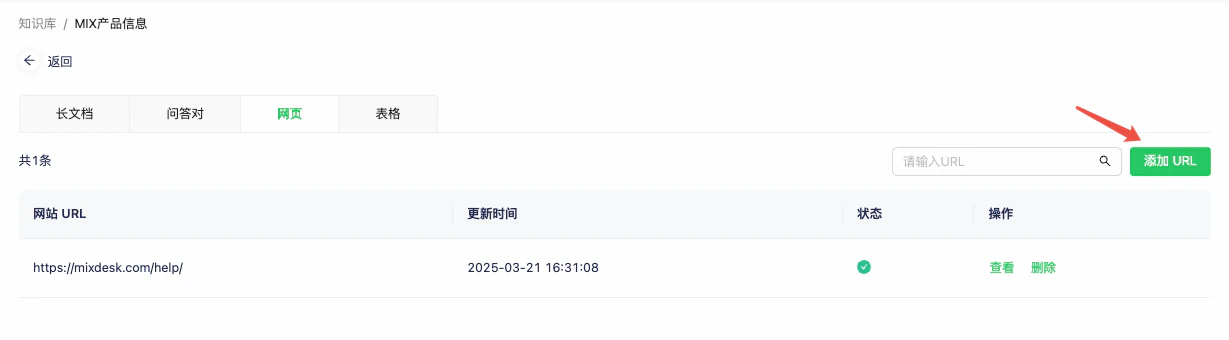
3.3 Add web URLs
- Add a page URL to fetch its content for learning. Allow time for the page to load.
- Only text is supported. Images and videos are not used.
- URL learning applies only to the specified page. Add separate URLs for other pages on the same website. (Note: Because web content can be less structured, documents or spreadsheets are recommended when detailed product understanding is required.)
3.4 Add spreadsheets
- Supported formats include .xlsx and .csv.
- Use spreadsheets for structured information, such as questions and answers or product details.
- 1. Q&A, for example:

2. Product information, such as name, details, and URL:

4. Link knowledge bases
- After creating a knowledge base, link it to the AI Agent. An agent can use multiple knowledge bases.
- Updates to a linked knowledge base synchronize in real time.
- Use the preview panel on the right to test replies.
Step 3: Use AI Agents in conversations
1. Assign an AI Agent through Automation
After configuring the AI Agent and knowledge base, use the Automation module’s Assign AI Agent node to route conversations to the agent.
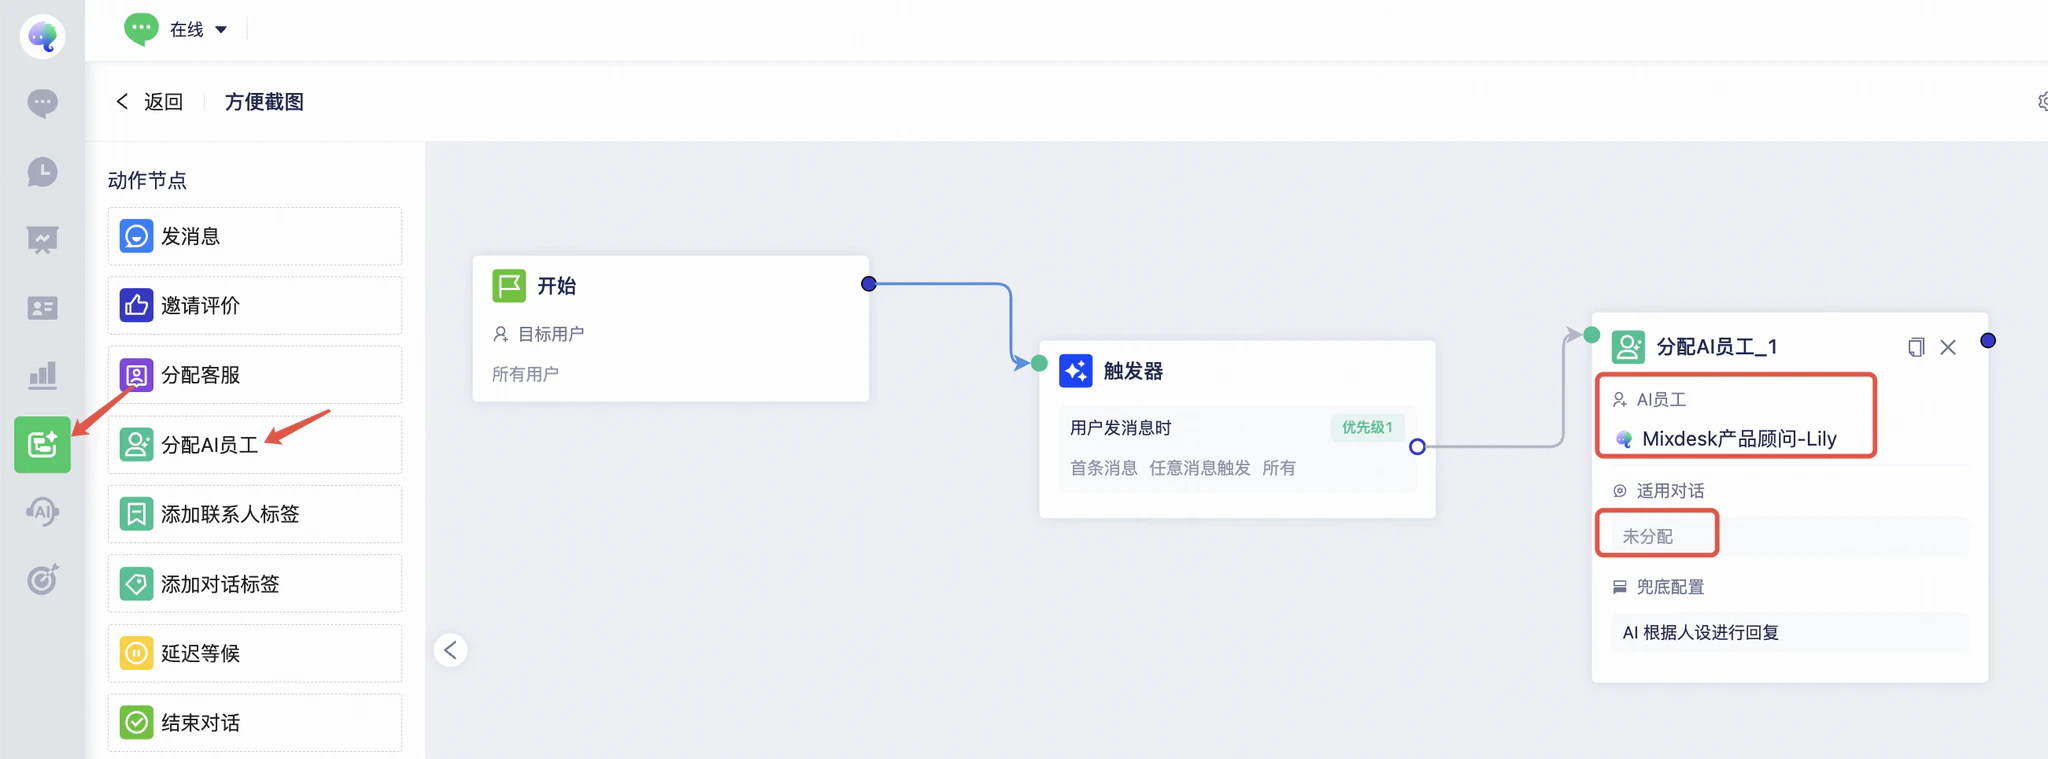
The assigned AI Agent uses its persona and knowledge bases to respond to customers.
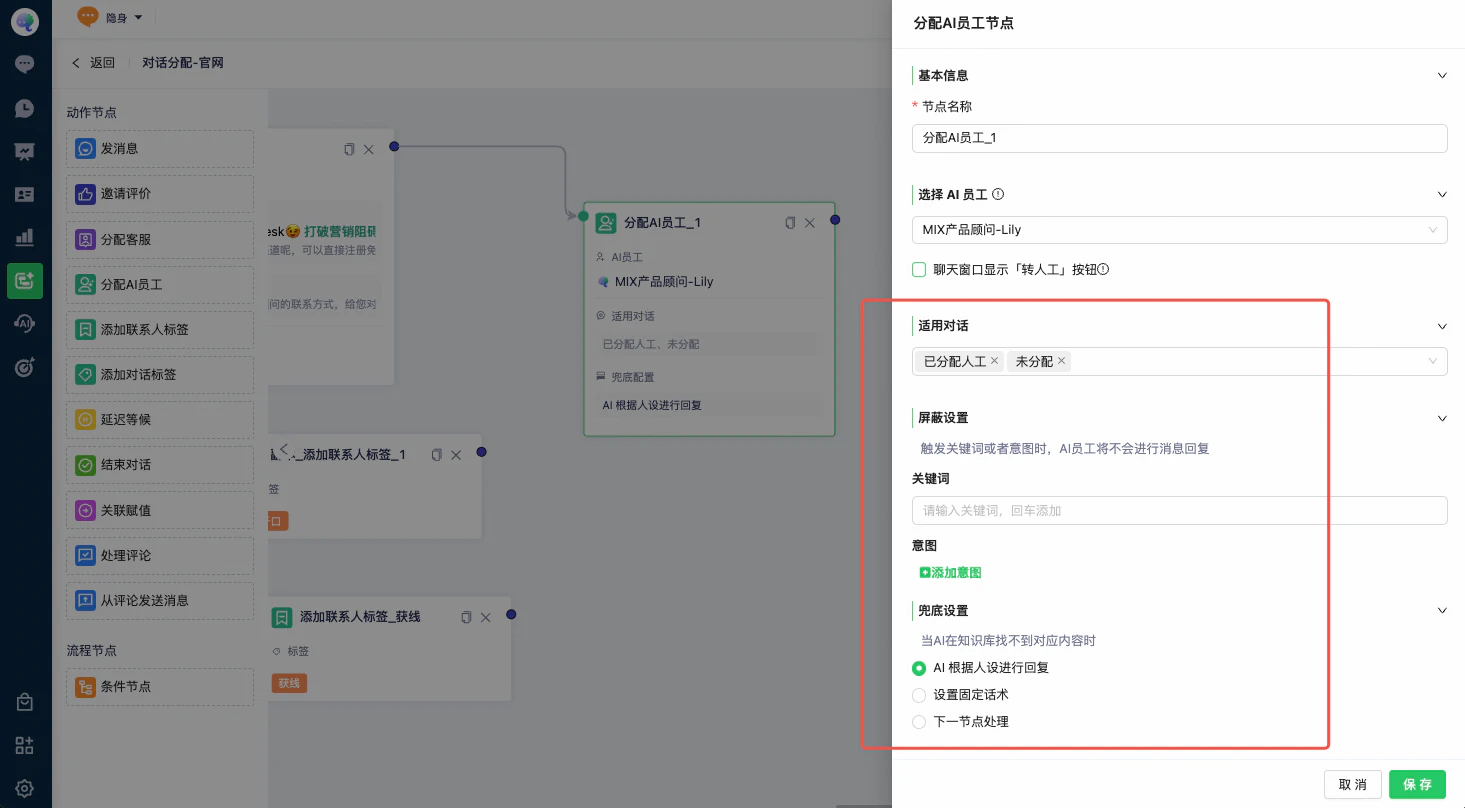
2. Configure the Assign AI Agent node
In addition to choosing an AI Agent, configure these options:
1. Human-transfer button: This option applies only to the Website channel. Social channels cannot display this button.
2. Applicable conversations: Select Unassigned, Assigned to Human, or Assigned to AI as needed. Assignment does not work for conversation states you have not selected.
3. Reply blocking: Prevent replies for specified keywords or intents.
4. Fallback settings: Choose what happens when the question is outside the persona or knowledge base, such as a request for today’s weather.
- Reply using the persona: Allow the language model to answer based on the configured persona, beyond the knowledge base.
- Use a fixed reply: Return a configured message for out-of-scope questions, such as “Sorry, I cannot answer that. Please send ‘Talk to a person’ to request human support.”
- Continue to the next node: For example, connect an Assign Team Member node for human support.