
This guide assumes basic experience developing iOS apps and familiarity with the relevant concepts.
Read the full guide before starting integration.
Before development, download the official demo and use it as a reference.
Use the latest SDK version where possible.
- Check Mixdesk on GitHub for the latest version.
- Demo developer tools: view the current SDK version
- Check #define MixdeskSDKVersion in MixdeskManager.h
- pod search Mixdesk may return an older version because of the local CocoaPods cache
Step 1: Import the SDK
CocoaPods is recommended for these reasons:
- SDK updates are easier.
- Manual updates require removing the old library, downloading the new one, and reconfiguring the project. Leftover files can cause conflicts.
- Swift projects support CocoaPods.
1.1 Import with CocoaPods
Add this to your Podfile:
pod 'Mixdesk', '~> 1.0.0'Install the Mixdesk pod:
$ pod install1.2 Import manually
1.2.1 Objective-C projects
In the downloaded MixdeskSDK-files folder, find MixdeskSDK.framework , MixdeskChatViewController , MixdeskSDKViewInterface , MixdeskNotification and copy these four folders into your project directory. Right-click in the project navigator and select Add Files to Your Project. Alternatively, drag them into the Xcode project navigator.
1.2.2 Swift projects
- Import the SDK files as described above.
- Add the required imports, including #import "MixdeskChatViewManager.h", to your bridging header. See: Add a bridging header.
1.2.3 Add dependencies
The SDK depends on system frameworks. Select your project, then TARGETS -> Build Phases -> Link Binary With Libraries and expand Link Binary With Libraries. Select + to add the following dependencies:
- libsqlite3.tbd
- libicucore.tbd
- AVFoundation.framework
- CoreTelephony.framework
- SystemConfiguration.framework
- MobileCoreServices.framework
- QuickLook.framework
Step 2: Integrate the SDK
After importing the SDK, complete these five steps for a basic integration.
- (BOOL)application:(UIApplication *)application didFinishLaunchingWithOptions:(NSDictionary *)launchOptions {
#pragma mark  Integration step 1: Initialize,  Parameters:appkey  ,Initialize the AppKey as early as possible.
    [MXManager initWithAppkey:@"" completion:^(NSString *clientId, NSError *error) {
        if (!error) {
            // Enable SDK bulk messaging here, Call only after SDK initialization succeeds
            // [[MXNotificationManager sharedManager] openMXGroupNotificationServer];
            NSLog(@"Mixdesk SDK: Initialization succeeded");
        } else {
            NSLog(@"error:%@",error);
        }
    }];
  /*Your code*/
    return YES;
}
- (void)applicationWillEnterForeground:(UIApplication *)application {
    #pragma mark  Integration step 2: Open the Mixdesk service in the foreground
    [MXManager openMixdeskService];
}
- (void)applicationDidEnterBackground:(UIApplication *)application {
    #pragma mark  Integration step 3: Close the Mixdesk service in the background
    [MXManager closeMixdeskService];
}
- (void)application:(UIApplication *)application didRegisterForRemoteNotificationsWithDeviceToken:(NSData *)deviceToken {
    #pragma mark  Integration step 4: Upload the deviceToken
    [MXManager registerDeviceToken:deviceToken];
}

#pragma mark  Integration step 5: Open the chat screen(button click handler)
- (void)pushToMixdeskVC:(UIButton *)button {
#pragma mark In general, For UI customization, see MXChatViewStyle.h and its methods.,For behavior customization, see MXChatViewManager.h and its methods.

#pragma mark  Basic integration: Use the default Mixdesk,   UI without customization.
    MXChatViewManager *chatViewManager = [[MXChatViewManager alloc] init];
    [chatViewManager setoutgoingDefaultAvatarImage:[UIImage imageNamed:@"mixdesk-icon"]];
    [chatViewManager pushMXChatViewControllerInViewController:self];
#pragma mark  Use the following method to customize the back button
//    MXChatViewManager *chatViewManager = [[MXChatViewManager alloc] init];
//    MXChatViewStyle *aStyle = [chatViewManager chatViewStyle];
//    [aStyle setNavBarTintColor:[UIColor redColor]];
//    [aStyle setNavBackButtonImage:[UIImage imageNamed:@"mixdesk-icon"]];
//    [chatViewManager pushMXChatViewControllerInViewController:self];
#pragma mark To use round avatars instead of square ones, ,set round avatars.
//    MXChatViewManager *chatViewManager = [[MXChatViewManager alloc] init];
//    MXChatViewStyle *aStyle = [chatViewManager chatViewStyle];
//    [aStyle setEnableRoundAvatar:YES];
//    [aStyle setEnableOutgoingAvatar:NO]; //Hide the user avatar
//    [aStyle setEnableIncomingAvatar:NO]; //Hide the team-member avatar
//    [chatViewManager pushMXChatViewControllerInViewController:self];
#pragma mark Customize the right navigation-bar button,Only do this when necessary; ,it is not recommended,because it removes Mixdesk functionality,This button displays human transfer when AI support is enabled in the workspace,Select to transfer to a human. 2During human support, it also allows ratings
//    MXChatViewManager *chatViewManager = [[MXChatViewManager alloc] init];
//    MXChatViewStyle *aStyle = [chatViewManager chatViewStyle];
//    UIButton *bt = [UIButton buttonWithType:UIButtonTypeCustom];
//    [bt setImage:[UIImage imageNamed:@"mixdesk-icon"] forState:UIControlStateNormal];
//    [aStyle setNavBarRightButton:bt];
//    [chatViewManager pushMXChatViewControllerInViewController:self];
#pragma mark Custom customer information
//    MXChatViewManager *chatViewManager = [[MXChatViewManager alloc] init];
////    [chatViewManager setClientInfo:@{@"name":@"123Test",@"gender":@"man11",@"age":@"100"} override:YES];
//    [chatViewManager setClientInfo:@{@"name":@"123Test",@"gender":@"man11",@"age":@"100"}];
//    [chatViewManager pushMXChatViewControllerInViewController:self];

#pragma mark Pre-send a message
//    MXChatViewManager *chatViewManager = [[MXChatViewManager alloc] init];
//    [chatViewManager setPreSendMessages: @[@"I have a question about order 1705045496811"]];
//    [chatViewManager pushMXChatViewControllerInViewController:self];

#pragma mark To connect your own user system, ,use custom customer information for user profile details
#pragma mark Ensure customId is unique,so each customId maps to exactly one Mixdesk user ID
//    MXChatViewManager *chatViewManager = [[MXChatViewManager alloc] init];
//    NSString *customId = @"Get your own user ID or another unique identifier";
//    if (customId){
//        [chatViewManager setLoginCustomizedId:customId];
//    }else{
//   #pragma mark The following line is incorrect, It would cause ID = "notadda" to be bound to several Mixdesk users,and expose one customer’s conversation to others
//        //[chatViewManager setLoginCustomizedId:@"notadda"];
//    }
//    [chatViewManager pushMXChatViewControllerInViewController:self];
}
Follow the integration pattern above and ensure identifiers are mapped correctly.
Step 3: Configure push notifications
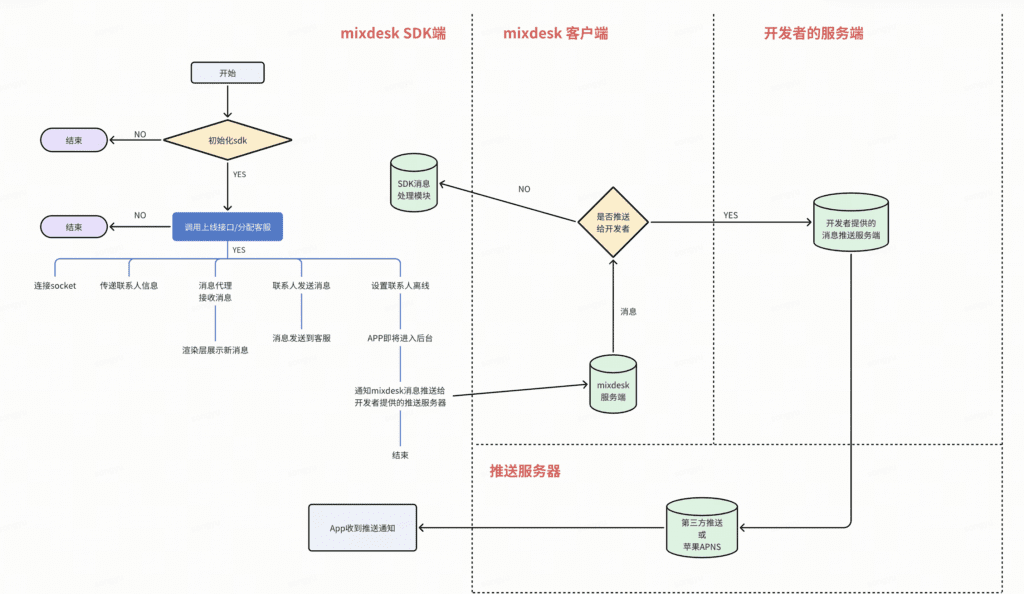
When the app enters the background, Mixdesk sends messages to your backend. Your backend then pushes them to the app through a provider such as JPush. See SDK workflow .
To configure the server URL, sign in as a Mixdesk administrator at mixdesk and go to Settings > SDK.
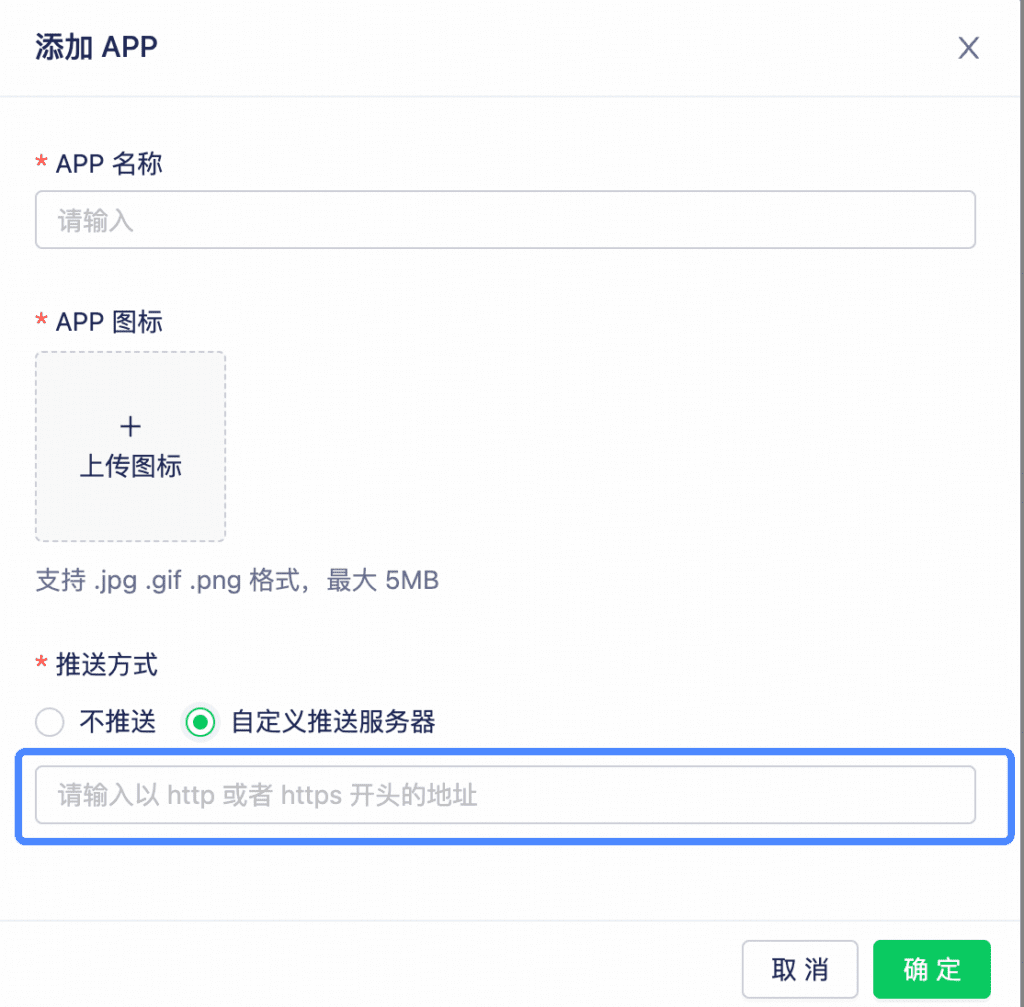
Push-message data structure
When a message needs to be pushed, Mixdesk sends it to your configured server using method POST and data format JSON .
Request format:
request.header.authorization contains the signature.
request.body contains the message data with this structure:
| Key | Description |
|---|---|
| id | Message ID |
| messageId | Current conversation ID |
| content | Message content |
| messageTime | Send time |
| fromName | Sender name |
| deviceToken | Recipient deviceToken as a string |
| clientId | Recipient contact ID |
| customizedId | Developer-defined custom ID |
| contentType | Content type: text/photo/audio |
| deviceOS | Device operating system |
| customizedData | Custom attributes uploaded by the developer |
| type | Message type: mesage = regular message; ending = conversation-ended message |
Verify the signature to validate the push data. Mixdesk provides signature-calculation examples in five languages: Java, Python, Ruby, JavaScript, PHP. See Mixdesk SDK 1.0 push-payload signature algorithm.
Basic integration is complete.
Step 4: SDK workflow
The diagram below shows the SDK workflow.
Note
- If you customize the open-source chat UI, fork the GitHub repository so you can merge upstream updates later.
Step 5: API reference
Initialize the SDK
All operations require successful SDK initialization and a usable clientId returned by Mixdesk.
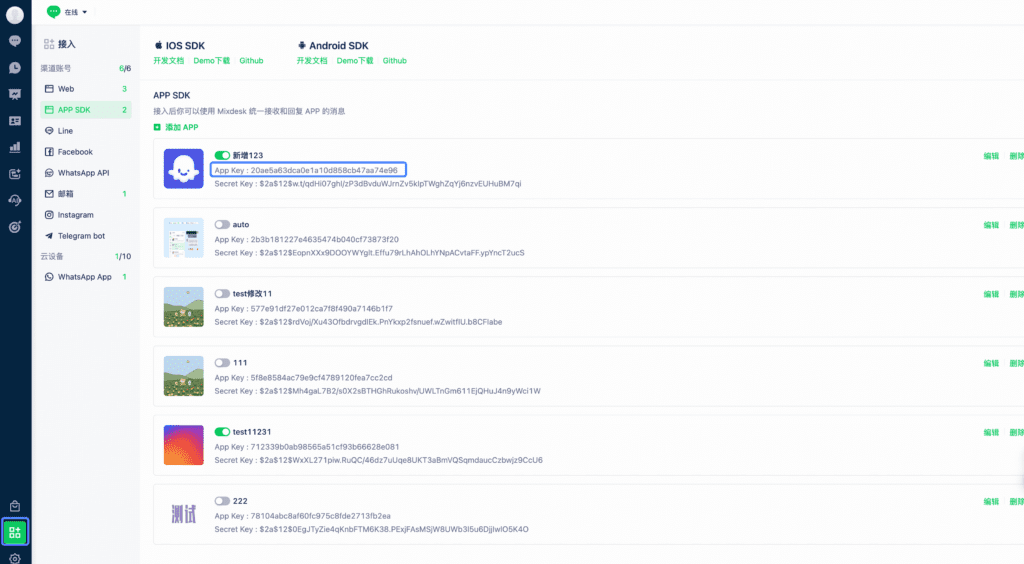
Register your app in Mixdesk to obtain an AppKey. In the AppDelegate.m system callback didFinishLaunchingWithOptions, call the initialization API:
[MXManager initWithAppkey:@"AppKey for your registered app" completion:^(NSString *clientId, NSError *error) {
}];
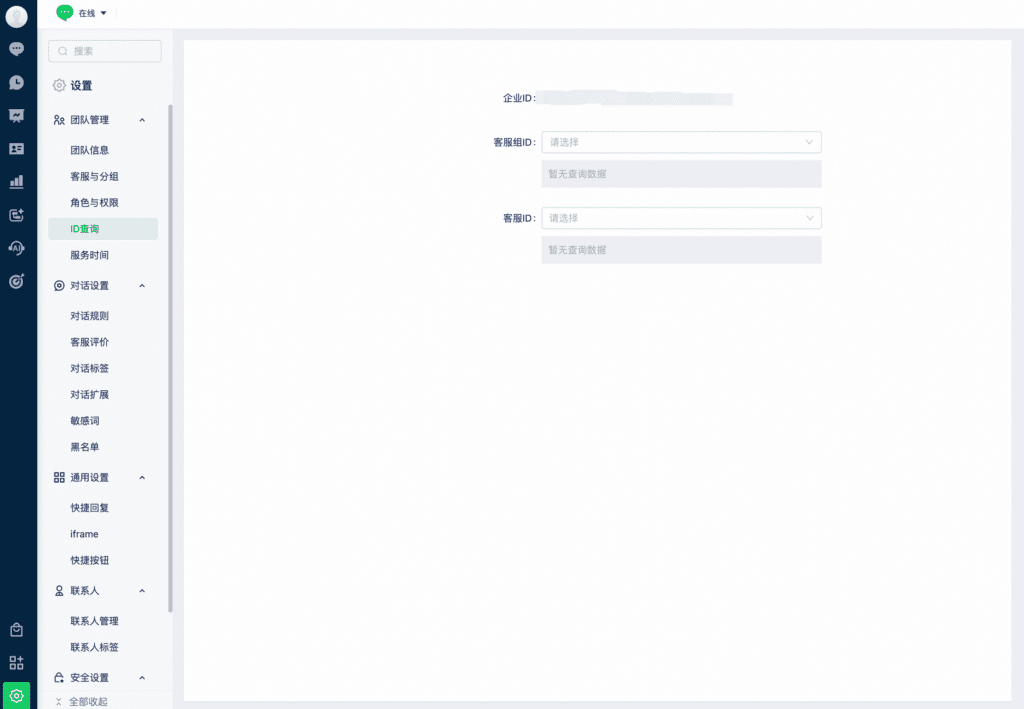
If you do not know the AppKey, sign in as an administrator at mixdesk and open Settings > SDK, as shown below.
Add custom information
Example result:
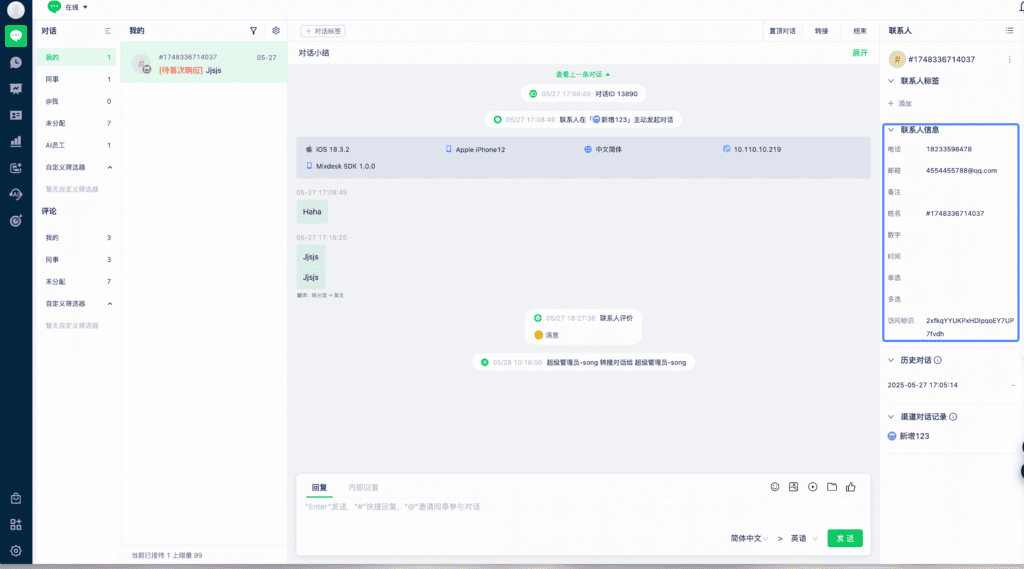
Upload user attributes to help team members support customers. Example:
//Create custom information
NSDictionary* clientCustomizedAttrs = @{
@"name"        : @"Kobe Bryant"
};

/**
 *  Set custom contact information
 *
 *  @param clientInfo Custom contact information
    @param override Force update. Unless set to YES, the values take effect only on the first call.
 */
[chatViewManager setClientInfo:clientCustomizedAttrs override:YES];
or
[MXManager setClientInfo:clientCustomizedAttrs completion:^(BOOL success) {
}];
Set the following predefined fields through the API above:
| Key | Description |
|---|---|
| name | Real name |
| tel | Phone |
| comment | Notes |
Note
- After enabling custom response events, handle them through notification listeners. Otherwise, selecting a bulk message will do nothing.
Note
- Set this option before bringing the user online.
Show the chat view
Open the Mixdesk UI when the user needs support:
MXChatViewManager *chatViewManager = [[MXChatViewManager alloc] init];
[chatViewManager pushMXChatViewControllerInViewController:self];
MXServiceToViewInterface is the adapter between the open-source chat UI and the SDK. It separates Mixdesk-specific business logic so the UI can be reused in other projects. Implement the methods in MXServiceToViewInterface to connect your own business logic.
Synchronize server messages
With synchronization enabled, pull-to-refresh retrieves conversation history from the server.
With synchronization disabled, it retrieves history from the local database.
A contact may use multiple devices, so local history can contain fewer messages than server history.
MXChatViewManager *chatViewManager = [[MXChatViewManager alloc] init];
//Enable message synchronization
[chatViewManager enableSyncServerMessage:true];
[chatViewManager pushMXChatViewControllerInViewController:self];
Set the contact ID for sign-in
Set a Mixdesk contact ID to bring that contact online.
MXChatViewManager *chatViewManager = [[MXChatViewManager alloc] init];
[chatViewManager setLoginMXClientId:clientId];
[chatViewManager pushMXChatViewControllerInViewController:self];
Note: If the server cannot find the ID, it returns a contact does not exist error.
Use the following API to obtain clientId:[MXManager getCurrentClientId].
Device language does not switch to Chinese
Add Localizations to your app’s info.plist so the SDK can detect the language. To support English, Simplified Chinese, and Traditional Chinese, include this configuration:
<key>CFBundleLocalizations</key>
<array>
    <string>zh_CN</string>
    <string>zh_TW</string>
    <string>en</string>
</array>
For more chat UI options, see MXChatViewManager.h .
SDK API details
This section covers key APIs. In MixdeskSDK.framework > MXManager.h, all APIs include detailed comments.
Use Mixdesk APIs to build a custom chat interface. Before calling them, remember to initialize the SDK.
API description
Initialize the SDK
Initialize in AppDelegate.m system callback didFinishLaunchingWithOptions as early as possible. On the first initialization, the SDK requests a contact from the server. Other APIs require successful initialization.
//Add this in AppDelegate.minside didFinishLaunchingWithOptions
[MXManager initWithAppkey:@"AppKey for your registered app" completion:^(NSString *clientId, NSError *error) {
}];
Register the deviceToken
Mixdesk needs deviceToken to send offline messages to your backend. Your backend can use the token to deliver a notification through APNs.
In AppDelegate.m, use the system callback didRegisterForRemoteNotificationsWithDeviceToken to upload deviceToken:
[MXManager registerDeviceToken:deviceToken];Disable Mixdesk push notifications
For details, see Push notifications.
Bring the current contact online
After initialization, a contact ID is available. Call this API to bring it online:
[MXManager setCurrentClientOnlineWithCompletion:^(MXClientOnlineResult result, MXAgent *agent, NSArray<MXMessage *> *messages) {
//Check result to determine whether the contact is online
} receiveMessageDelegate:self];
Bring a contact online using its Mixdesk contact ID
Use the Get Current Contact ID API and store the ID in your backend to link it with your user system.
Pass the saved ID to bring that contact online and make it the current contact.
[MXManager setClientOnlineWithClientId:clientId completion:^(MXClientOnlineResult result, MXAgent *agent, NSArray<MXMessage *> *messages) {
//Check result to determine whether the contact is online
} receiveMessageDelegate:self];
Bring a contact online using a custom ID
Alternatively, pass your own user ID. Mixdesk binds it to a contact, which subsequent calls with the same ID bring online.
The contact associated with that custom ID becomes the current contact.
Important:Do not use an auto-incrementing custom ID. Predictable IDs can enable impersonation; store the Mixdesk contact ID instead if necessary.
[MXManager setClientOnlineWithCustomizedId:customizedId completion:^(MXClientOnlineResult result, MXAgent *agent, NSArray<MXMessage *> *messages) {
//Check result to determine whether the contact is online
} receiveMessageDelegate:self];
Listen for contact-online notifications
After a contact comes online, use this notification to upload custom information or perform other actions. The notification is named MX_CLIENT_ONLINE_SUCCESS_NOTIFICATION and defined in MXDefinition.h .
Get Current Contact ID
Use this API to obtain and store the contact ID in your backend, linking it to your user account.
NSString *clientId = [MXManager getCurrentClientId];Create a new contact
Call this API to initialize a new contact.
The new contact has no history or user information.
Store the ID and link it to your app user if needed.
[MXManager createClient:^(BOOL success, NSString *clientId) {
//Store this clientId
}];
Set the contact offline
NSString *clientId = [MXManager setClientOffline];While the contact remains online, the configured delegate receives real-time messages and new-message notifications. Use them to display an unread badge.
When the contact is offline, messages are sent to your backend.
Recommendation: Leave the contact online after exiting the chat screen if you need to receive new-message notifications.
Listen for incoming messages
Register a notification listener to alert the contact about new messages. The notification name is MX_RECEIVED_NEW_MESSAGES_NOTIFICATION and defined in MXDefinition.h .
Read its userInfo to obtain an array of Mixdesk message MXMessage objects, for example:[notification.userInfo objectForKey:@"messages"]
Note: If you leave the contact online after exiting the chat screen, you continue to receive new-message notifications.
### . Listen for new-message notifications where appropriate
[[NSNotificationCenter defaultCenter] addObserver:self selector:@selector(didReceiveNewMXMessages:) name:MX_RECEIVED_NEW_MESSAGES_NOTIFICATION object:nil];

### Listen for incoming Mixdesk messages
- (void)didReceiveNewMXMessages:(NSNotification *)notification {
//Message array in the notification
NSArray *messages = [notification.userInfo objectForKey:@"messages"];
NSLog(@"Received a team-member message notification");
}
Get the assigned team member
Use this API to retrieve the team member currently supporting the contact:
MXAgent *agent = [MXManager getCurrentAgent];Add custom information
For custom contact information, see Add custom information.
Get more messages from the server
Retrieve server-side history with this API:
[MXManager getServerHistoryMessagesWithUTCMsgDate:firstMessageDate messagesNumber:messageNumber success:^(NSArray<MXMessage *> *messagesArray) {
//Display the retrieved messages
} failure:^(NSError *error) {
//Handle errors
}];
Note: Server history includes messages for the contact across all platforms, including Web, Android, and iOS. Call this from the chat screen’s pull-to-refresh handler.
Get local conversation history
Because the Get more messages from the server API uses network data, you can instead retrieve history from the local iOS SDK database.
[MXManager getDatabaseHistoryMessagesWithMsgDate:firstMessageDate messagesNumber:messageNumber result:^(NSArray<MXMessage *> *messagesArray) {
//Display the retrieved messages
}];
Note: Local history may contain fewer messages because it is not synchronized with the server.
Receive real-time messages
The three contact-online APIs above include a parameter for the message delegate. Configure this delegate to receive messages.
After setting the delegate, implement MXManagerDelegate > didReceiveMXMessage: to receive messages in the callback.
Send messages
Call this API to send text messages:
[MXManager sendTextMessageWithContent:content completion:^(MXMessage *sendedMessage) {
//Handle successful message sending
}];
Call this API to send image messages:
[MXManager sendImageMessageWithImage:image completion:^(MXMessage *sendedMessage) {
//Handle successful message sending
}];
Call this API to send audio messages:
[MXManager sendAudioMessage:audioData completion:^(MXMessage *sendedMessage, NSError *error) {
//Handle successful message sending
}];
Call this API to send video messages:
[MXManager sendVideoMessage:filePath completion:^(MXMessage *sendedMessage, NSError *error) {
//Handle successful message sending
}];Note. The callback returns a message object. Inspect its status to determine whether sending succeeded.
Get unread messages
This API merges unread messages from local storage and the server. Use it to display the unread count. Entering the chat screen clears unread messages.[MXManager getUnreadMessagesWithCompletion:completion]
Get unread messages for a custom ID
Retrieve all unread messages associated with a custom ID.[MXManager getUnreadMessagesWithCustomizedId:customizedId completion:completion]
Record and play audio
Recording and playback each support three modes:
- Pause other audio
- Play alongside other audio
- Lower the volume of other audio
Choose a mode by configuring these two properties in MXChatViewManager.h :
@property (nonatomic, assign) MXPlayMode playMode;
@property (nonatomic, assign) MXRecordMode recordMode;
If the host app plays audio, such as background music in a game, set @property (nonatomic, assign) BOOL keepAudioSessionActive; to YES so the AudioSession is not closed after recording or playback.
In games, use the play-and-record audio category; otherwise, audio may fail to play after recording.
Pre-send a message
In MXChatViewManager.h, set @property (nonatomic, strong) NSArray *preSendMessages; to automatically send text or an image when the customer opens the chat window.
Observe chat-screen appearance and dismissal
MX_NOTIFICATION_CHAT_BEGINSent when the chat screen appearsMX_NOTIFICATION_CHAT_ENDSent when the chat screen disappears
User queue
Listen for:
When a team member accepts the user, an MX_NOTIFICATION_QUEUEING_END notification is sent.
Step 6: Embed Mixdesk in another SDK
If your project is itself an SDK, complete normal integration and the following additional steps.
Import Mixdesk, add dependencies, initialize it, and use its APIs as with an app integration.
If you use the provided chat UI, also expose its resource bundle:
Select your project, then TARGETS -> Build Phases -> Copy Files and expand Copy Files. Select + to add the Mixdesk resource bundle MXChatViewAsset.bundle.
When publishing your SDK, package MXChatViewAsset.bundle with it.
Step 7: Terminology
Your push-message server
Mixdesk sends SDK offline messages as webhooks to the URL you provide.
The server receiving these messages is Your push-message server.
Mixdesk contact ID
After a contact comes online or a conversation is assigned, the SDK has a unique ID.
Save this ID to bring the same contact online on another device and synchronize their information and history.
Developer-defined custom ID
An ID from your own system, such as user_id.
After a successful online request, your ID is bound to a Mixdesk contact ID. Use it on another device to synchronize previous data.
Note: If your ID is predictable, such as an auto-incrementing number, store the Mixdesk contact ID and use it for online requests instead.
Step 8: Troubleshooting
Update the SDK
1. CocoaPods integration
Update the Mixdesk version in your Podfile, change to the project directory in a terminal, and run pod update mixdesk to update the SDK.
2. Manual integration
1. Use Show in Finder to remove the four Mixdesk folders from the project.
MixdeskSDK.framework , MXChatViewController MXChatViewInterface and MXMessageForm
2. Clean the project in Xcode.
3. Download the latest demo from GitHub and locate MixdeskSDK.framework , MXChatViewController MXChatViewInterface and MXMessageForm. Copy the folders into the previous SDK location in your project using Show in Finder.
4. Use Add Files to to add the four copied folders back to the project.
Green bar and unusable composer on iOS 11
Update the SDK to a version with iOS 11 support.
Before a major iOS update, ask technical support whether an SDK update is required.
SDK initialization fails
1. Missing NSExceptionDomains
Without NSExceptionDomains, the SDK returns MXErrorCodePlistConfigurationError and logs:Mixdesk SDK Error: Add NSExceptionDomains to your app’s info.plist. See https://github.com/Mixdesk/MixdeskSDK-iOS#info.plist%E8%AE%BE%E7%BD%AEIf this occurs, configure NSExceptionDomains
Note. If the error remains, check that you did not add the setting to the test target’s info.plist instead.
2. Network problems
If configuration is correct, check the device’s network connection.
Navigation bar is missing
The open-source UI uses the system UINavgationController. Possible causes include:
- When presenting with
Pushmode, the suppliedviewControllermay not be based onUINavigationController. - When presenting with
Pushmode, theUINavgationBarmay be hidden or transparent. - The app may use
Categoryto modifyUINavgationBarin a way that prevents display.
For the first two cases, you can also use present presentation mode instead of changing the navigation setup.
Xcode Warning: was built for newer iOS version (7.0) than being linked (6.0)
This warning can occur if the app’s minimum supported version is below iOS 7.0.
ld: warning: object file (/Mixdesk-SDK-Demo/MXChatViewController/Vendors/MLAudioRecorder/amr_en_de/lib/libopencore-amrnb.a(wrapper.o)) was built for newer iOS version (7.0) than being linked (6.0)
The SDK’s open-source library opencore-amr was rebuilt for Bitcode support. This does not prevent iOS 6 use. If you do not need Bitcode, replace opencore-amr with an older version:Download
The static library is large
The static library contains armv7, arm64, i386, and x86_64 architectures plus Bitcode. The source guide estimates an increase of about 100 KB in the compiled host app.
Gap between the keyboard and composer
Check whether you use the third-party library IQKeyboardManager, which can conflict with the composer layout logic.
Solution (thanks to RandyTechnology for identifying the cause and solution):
- In MXChatViewController.viewWillAppear, add
[[IQKeyboardManager sharedManager] setEnable:NO];to disable IQKeyboardManager on this screen. - In MXChatViewController.viewWillDisappear, add
[[IQKeyboardManager sharedManager] setEnable:YES];to re-enable IQKeyboardManager before leaving.
Incorrect inputBar height with TabBarController
TabBarController layouts vary and may use custom tab bars, so adjust your app or SDK code as needed. On iOS 7 and later, changing the tab bar’s hidden and translucent property often resolves the issue.
Listen for messages outside the chat screen
See Listen for incoming-message notifications.
Third-party library conflicts
If your app uses a library also included in the chat UI, duplicate class names may cause conflicts. Remove the duplicate code from Chat UI > Vendors.
Note: Some bundled libraries contain Mixdesk customizations. Removing them can remove those effects. See GitHub: Mixdesk open-source chat UI.
Incorrect app name in contact information
If the App field in contact visit information shows the bundle name or “SDK cannot get app name”, check that CFBundleDisplayName is set in the app’s info.plist.
Undefined symbols during compilation
Check that App Target > Build Settings > Search Paths > Framework Search Paths or Library Search Paths includes the Mixdesk project.
Xcode 14 changes
- Bitcode removal
- iOS SDK v3.8.5–v3.9.0 supports arm64 only on physical devices
Vendors: Third-party libraries
The SDK uses the following open-source libraries. Remove duplicate copies if your project uses the same ones.
| Third-party library | Tag version | Description |
|---|---|---|
| VoiceConvert | N/A | Converts AMR and WAV audio. The original source is not identified in the source documentation. |
| MLAudioRecorder | master | Transcodes while recording, plays remote audio with local caching, and supports real-time audio.Note: Because the project’s lame.framework does not support bitCode, the MP3-related files were removed. |
| GrowingTextView | 1.1 | A text view that adjusts height with its content, used for the message composer. |
| TTTAttributedLabel | A label with multiple display effects, used for chat-bubble text. | |
| CustomIOSAlertView | Custom | A custom AlertView used for conversation ratings.Note: Mixdesk modified this library to add button separators, detect an existing AlertView, and adjust frames when the keyboard appears. See the modified version at CustomIOSAlertView; |
| AGEmojiKeyboard | 0.2.0 | A customized emoji keyboard. See the project source for its layout. |